
This is a fairly easy method of making a antique looking frame appropriate for even your nice petit-point picture or sampler. It is unique, not manufactured looking. You will need to be able to paint thin lines but the method eliminates the need to have a steady hand and it doesn’t have to be straight! There are two methods – notched corners and butt joint (easier). Both result in a nice hand made antique (sort of Tramp Art) look.
Materials:
Small dowels, toothpicks or skewers (extra long toothpicks - grocery store)
Acrylic paint, Burnt Umber or very dark brown
Folk Art (brand) Antiquing Medium (Hobby Lobby or craft stores)
X-acto knife with new blade
Artwork to frame
Small scrap of matboard (from an old frame)
Very tiny paintbrush (10/0 or similar)
Larger round paintbrush (5 or 6 round or similar)
tacky glue

Faux Bamboo Paint Technique:
For this project you want very tiny rings but you want them dark. Squirt a little Burnt Umber paint on a plastic yogurt lid (or other palette) and put a tiny drop of water beside it DON’T MIX THEM YET!

Paint the Rings: Practice on one toothpick: Get your tiny brush (10/0 or so) wet with paint. Hold the toothpick with one end touching your work table and the other end with your thumb and index finger so you can gently roll the toothpick in place while painting the rings. Try first with paint directly from the bottle for your first ring around the toothpick. If it skips or seems too dry, mix in a little water – with trial and error you will find the best mix that flows smoothly while making the thinnest dark line. (It must be dark so it will show through the ‘antiquing’ step).
Continue making rings all along the toothpick about 3/8 or ½ inch apart. Do all your toothpicks (enough for all you want to frame).
 |
| Comparison of steps - rings, speckles, antiqued (top to bottom) |
Paint the Speckles: After the rings are done, paint tiny speckles between the rings – using 2 or 3 tiny dots (tiny as possible but dark enough to show up when antiqued). Twist your toothpick and make sure you speckle all sides so no matter which side is up you can see rings and speckles.
Let dry thoroughly (15 min or so).
 |
| Close up of speckles and antiqued skewers |
Antiquing: With your larger brush, cover the toothpick with a sort of thick coat of antiquing medium. Because these skewers/toothpicks don’t absorb very well, I let it sit 30 seconds or so. Then wipe off gently with a dry paper towel (not wet – it will take off too much). Again, use trial and error to determine the time needed for the look you want. Let dry thoroughly (the antiquing medium takes a while to dry – 30 min?). If you decide you want it darker, wait until it is thoroughly dry before you re-coat or you will just take more of the glaze off.
 |
| Antiquing |
Framing:
Mount your art:– For mounting petit point or needlework, I used mat board scraps which I made thinner by splitting and peeling a few layers off the back. Then I wrapped the excess silk gauze around to the back and glued it. If you don’t want to put any glue on the actual needlework, glue the back of the mat board to a slightly larger (by the width of a toothpick) piece of index card or fabric. Then (later) you can glue your frame to that and no glue has to touch the stitches.
If you are framing a paper picture, consider if the mat board is thin enough by laying the mat board next to a skewer. The skewer should be slightly thicker. If necessary, peel some layers off the back of the mat board.
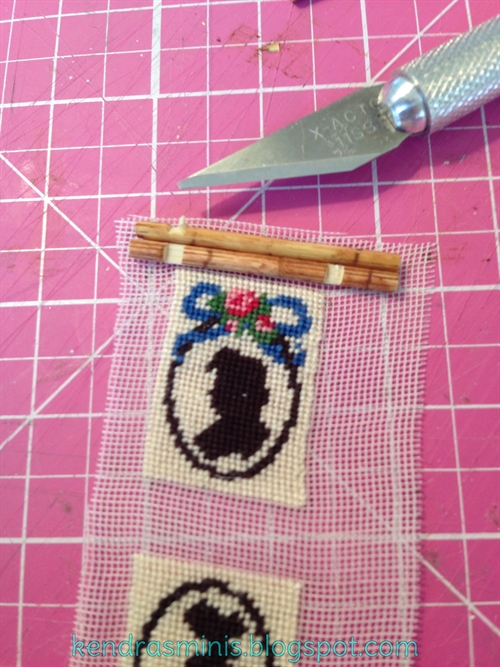
Notched look – first cut the lengths: For a notched frame (criss-cross at each corner), cut the four pieces of painted faux bamboo so they extend ¼ inch on each side of the art (total of ½ inch longer than the side of the art). To cut the sides to length, use your X-acto knife with a new blade (these skewers are very hard). On your cutting surface, gently roll the toothpick while cutting.
Make the Notches:
(Note that when making the notches, the cuts should be deep enough to feel them (when you slide your knife across the bamboo) but NOT go all the way through. The goal is to remove a small notch of wood halfway through the thickness of the toothpick. You will be making two notches on each side of the frame. Both notches on each piece of wood will face the same way.
Lay one cut bamboo piece against the art, centered along the side you are framing, and mark with the X-acto where the first notch should start (right up next to the art). This mark should be kind of deep, so you can feel it and find it again. Then, about 1/16 inch away from that, toward the end of the bamboo make another cut, deep enough to feel it. Pull the skewer away from the art and deepen each cut a little (CAREFUL! DON’T CUT THROUGH!!). Remove the notch between the cuts by slowly and gently twisting the knife TOWARD THE CENTER OF THE SKEWER. Keep cutting and removing until you think you have a notch about half way through. Repeat for the other notch and for the other 3 sides of the frame. When you have all 4 sides each with 2 notches, dry fit the notches together so they overlap and see if you need to enlarge or clean them up a little. (mine were not exactly half way through so two sides were a little higher than the other two after the frames were done – I was afraid to notch them too much and risk cutting through).
 |
| Positioning of notches |
 |
| Match notches on opposite side pieces |
Now is the time to trim the ends if they are not even or if you just want the overlap to be smaller. Also you can touch up the ends of the bamboo with a little antiquing medium.
Glue frame pieces to the art (or to the backing piece) weight down and let dry.
Un-notched or Butt Joint method: (see photo at beginning of blog) Cut the shorter sides first. Glue the shorter sides to the art, right against the edge of the mat board (its thickness is enough to hold the bamboo frame). Clamp these if you want.
When dry, cut the longer pieces so they extend beyond the first pieces as much as you like. Glue the last two frame pieces up against the mat board and the other bamboo pieces. Again, clamp if desired. When dry touch up the ends of the cut bamboo with antiquing medium.
 |
| Frames hung in my Antique Shop |
Thank you for this nice tutorial. I will try your technique ;)
ReplyDelete